Tuesday, July 26, 2011

It's My Birthday

My Bro-N-Law bought me this beautiful
Ice Cream Cake from Baskin/Robbins
Then he took me & hubby out to dinner
for Mexican Food...problem was everyone ate
too much to save room for dessert.......
but there is always tomorrow!
I was making a wish!
                                     
This photo I decided to look at the camera...I am hoping this cake is going to taste as good as it looks!
I had so many birthday wishes from friends all over Facebook, and relatives, and grandchildren...It is always to nice to know there are people out there who take time to wish me well on my special day.....because when all is said and done...what else is there if you don't have friends and family wishing the best to you on your special day!

Tewshay Birthday Gifts

Hello fellow crafters!!!!! Today is my BIRTHDAY........YAY!!!! Here is some of the gifts I received for my birthday. I am looking forward to making many new projects with it. Once again, thank you for stopping by and please...leave me a comment to let me know you stopped by.

Saturday, July 23, 2011

Knitty Gritty

Here is my finished project, I did add some stickles to the larger ball of yarn afterwards......

Knitty Gritty

Happy Birthday Diva's


Happy Birthday Diva's.....these two cards were made with (2) friends who's birthday are before mine this month, the red/blk is for a birthday girl's birthday today (23rd), and the black/wht is for a girl's birthday is the day before mine on the 25th!!! Go Leo strong lioness!!!
the cards were made from my 6 1/2x 5" recollection ready made cards, the cardstock used is bazzill, the polka-dot paper is from paper trey ink, the ribbons are from my stash. with added embellishments of buttons, and twine from the twinery, the dress form is from sizzix, the stamp sentiment is from Stampin-Up!
I sure hope they like their cards, I also hope this inspires you to make cards using your imagination to express yourself. Thanks for stoppin by, comments are always welcomed.

Tuesday, July 19, 2011

Yamashiro Restaurant

I was sorting through photos the other day and ran across a few photos of a date my fiance (now my husband) on at Yamashiro's Restaurant up in Hollywood Hills! My goodness time definitely flys....these photos were taken back in late 1979.....but the memories all came back when I saw them...I thought it would be fun to use my creative critters cart to cut out my Panda Bear and the noodles even tho they represent chineese cuisine, Yamashiro is Japanese....but I think my message was to show asian look!
Recipe for characters were cut at 3". Hope you are inspired to spice up your lay outs with characters as well!

Sunday, July 17, 2011

Clearwater Florida

I am really enjoying doing L.O. again! I did not remember how much fun they were to do until I started incorporating some of my carts characters...this crab is adorable and I was so glad to add it to my L.O. regarding a seafood restaurant I once visited in Clearwater Florida. The other cart was "Life's a Beach" both cuts were done at 4". I'm on a roll....guess I will do another L.O. coming up........

Saturday, July 16, 2011

Mother's Day 2011

I decided it was time to do another layout!  I was searching for my camera's SD-CARD, and when I finally found it, I put in my little Epson Photo Lab to see what pictures I had not printed out, and then I realized I had not printed out my Mother's Day photo of my two youngest! I have been busy using my other camera and this SD Card had been missing since May......anyway I decided to do a layout. These photos are special to me because last Mother's Day 2010 both of my kids were living in other parts of the U.S. My daughter was in Atlanta, and my son was in Texas....it was really rough getting through that day....but this year both kids were here to celebrate with me. My daughter had moved back to Calif. last Septemeber, and my son surprised me by flying in to spend Mother's day weekend with me!
Recipe for this layout: 12x12 white cardstock background
I took a country blue strip2 1/2x7" trim the edge with MS Floral punch
I overlayed the top with a 1 1/2" x7" strip to place the lettering on ....I used Jubilee Cart  for the letters cut @ 1 1/2" then I popped the sign to give demensions. I matted the photos with the same colors, and the smaller photo with the three of us I found a printed punch out frame from my stash.
I then added the punch out of MEMORIES and popped it, I took some organza ribbon and placed it in the center of the LO and added ribbon bows and three buttons...different sizes and bakers twine made bows with the twine. Then I found that I had in my stash a Recollections silk flower that matched...I did my journaling on the computer and matted it on white cardstock, then I frame it with country blue cardstock (from DCWV) I thought the mini button brads were cute so I added those around the journal tag and then popped the entire tag, I used black & white gel pen to doodle around the edge of white and blue tag.
I hope you get some great LO ideas from this posting....until next time....have a crafty weekend!

Happy Birthday Tyrell


Happy Birthday to my good friend TYRELL.....it is funny how we met...at a car wash back in 2007...I was carrying a scrapbook magazine and she spotted me with the magazine and viola....been friends ever since.
We now get together and have crop sessions together, and we are both planning on going to the "ALL DAY CROP" in Orange County on Sept. 10th.....I decided to give her something she would truly find use of so I made her dust covers for her cuttlebug, imagine, baby bug.....she absolutely went crazy over them.....I am so glad she liked them... the card of course is done in her favorite color-purple....Tyrell I know you are enjoying your covers and I cannot wait to see the color of the scrap room you will be placing these in.
The recipe on the card: the dress form is from Sizzix (retired) and the flower is from recollections, I added some bling down in the lower right corner, some white gel for doddling on the dress to add polka-dots, I made my tag and punched the edges with my chomper, added some brads, and used my frost white ink from colorbox....I hope you find inspiration in the card I made for my friend...and if you are interested in the Dust Covers for ordering, leave me a comment and I will forward to you the info!
Please leave a comment so I know you came by.....until next time....have a creative weekend!

Friday, July 15, 2011

Happy Birthday to HUBBY!


Hello fellow crafters!!! Hope you are gearing up for a creative weekend.....unfortunately tomorrow I will be dividing my craft time to spend the evening with hubby to celebrate his birthday. I made this card for him today and I was not quite sure what I wanted to create, I knew it needed to be something different from what I had made in the past, so I selected my background pattern first, which was from "My Minds Eye", then I decided to work with creams and chocolate....so then I reached for my "A Childs Year" cart and found the tag shape to stamp the sentiment on ..tag was cut at 1 3/4"(cream tag) the chocolate background tag was cut @ 2", I placed a chocolate brad in the center, I used Tim Holtz distress ink-tea dye around the edges...added some chocolate gel ink to doodle around the curves. the sentiment says "the more Candles, the bigger the Wish!" from stampin-up, I then thought about placing this on top of something that would really make it pop, so I pulled out my embossing folder that says HAPPY BIRTHDAY....I added some chocolate gros-grain ribbon, a bow, and MS butterfly punch brought it all together..awhhhh! So glad  I came up with something different, and classy for my man (lol).....I also used my chomper to do a little something extra on the pattern background edges....I hope you find this card inspiring....and don't be afraid to add butterflies to your man's card.
Your comments as usual are always welcomed!!!!
Until next time....keep those creative juices flowing......

Thursday, July 14, 2011

MPS DT 2012 CALL CHALLENGE

This is my entry for the MPS DT 2012 CALL CHALENGE!!!
The colors required for the challenge are, Orange, Turquoise, Green, Brown (opt. another color of my choice) I chose Cream!
I decided to do a layout this time! I began with selcting my background paper: My Minds Eye
My cartridges are : Don Juan for the lettering cut @ 2 1/2"
                             Sweet Treats: Cake & Hat cut @ 2 1/2"
                             Picturesque: Butterfly cut @ 2 1/2"-glittered with Martha Stewart's glitter pen
Buttons are from my stash, twine is from "The Twinery"
I used small lime green floral brads on the sign!
My journaling was done on the computer the distress ink-antique linen by Tim Holtz was used along the edges.
The theme is a birthday celebration for my father's 75th  which was 4yrs ago.
It just so happens that some of the colors are also worn by my family and friends....
I hope you will be inspired to use some of your older photos and bring life to them by doing a page layout!
There are so many memories in photos that you can re-live the event again by doing a beautiful lay out.
Thank you for stopping by....leave me a comment so I will know you came by for a visit.

Wednesday, July 13, 2011

BFB Award

What a beautiful award to receive and I feel honored! Thank you soo much Ana from scrappypinkcorner.blogspot. I received this award just today from Ana, and she wants me to say something about myself and pass this award on to 5 other well deserving ladies.
The one thing I can say about myself is , with all the other craft ventures I have indulged in, this one is definitely at the top of the list for holding my interest. Working with paper reminds me of when I first got involved with quilting. I learned that when you want to build and create something from a swatch, you draw colors from the swatch and layer and create with colors that compliment your center piece. I loved to quilt, but after so many years of doing that I had given quilts to friends, family and even now ever so often I might whip up something to give as a lap quilt, or quillow (quilt that folds into a pillow) for that special person on a special occasion.
I truly love making cards, never thought I would stray from doing lay outs.....soo now I need to balance out my creations and do more layouts....I hope you find my creations inspirational ....and now to share with you 5 ladies worthy of being mentioned: http://www.reginaeaster.blogspot.com/
                                                       http://www.creationswithchristina.com/
                                                       http://www.byadrian4u.blogspot.com/
                                                       http://www.cricutjunkiecreations.blogspot.com/
                                                       www>snipitsofkelly.blogspot.com
you might want to stop by and check out their wonderful creations, leave them a comment while you are there.
And Ana, thank you again for giving me this award!

Monday, July 4, 2011

Miss Lady Bug Note Pad

This is the last one for today....I call this Miss Lady Bug!
I had this laying around and decided to make a note pad for her.....she is cut from Create A Critter and she was cut @ 3"....she is adorable....

Girlfriends' Shoppin Note Pad

Oh Yeah, this can be addicting (lol) this was way to easy to decorate....just wanted to show another version for style of the serious shopper who doesn't want to forget cetain sales going on when she gets to her destination!!! You know you could lose sight of why you were at that particular store (lol)....this was a fun project........ measurements are same as the previous note card, I think I will give this one to my mom, she is one classy lady.....when you pull this little jewel out in public, you are bound to get some great compliments.....also this is a cool way to use up some of those scraps. Enjoy!

Mini "Minnie-Note Pad"

I attended a baby shower a few months ago, and one the the prizes I won playing a game was a pack of these mini-gel pens along with a tablet. I didn't think much about the pens  until recently when I rearranged my scrap room, then I thought it would be a good idea to make a notepad cover and attach the pens, I recieved (6) pens, so I will be making notepad covers to match. I went to "Big Lots" and picked up 5 notepads in a pkg for $1, so yes, I had to get (2pkgs)  since I really needed (6) pads...(lol) anyway, I  decided that since I have been scrapping for a little over 4 years,and at the time when I first bought this popular cartridge,  I never really knew how to do the layer effect on the "Mickey & Friends" , so today I pulled out my cartridge and used it ....now that I am a lot less intimidated...(lol) I thought Ms. Minnie came out sooo cute, I had to share her with you, these are fabulous to give as gifts at your next crop session, or for whatever. I am making these today and will be doing all sorts of characters....I will be giving this one away for friend's birthday this month. Here is the recipe on how I made my note cover with the ribbon pen holder:
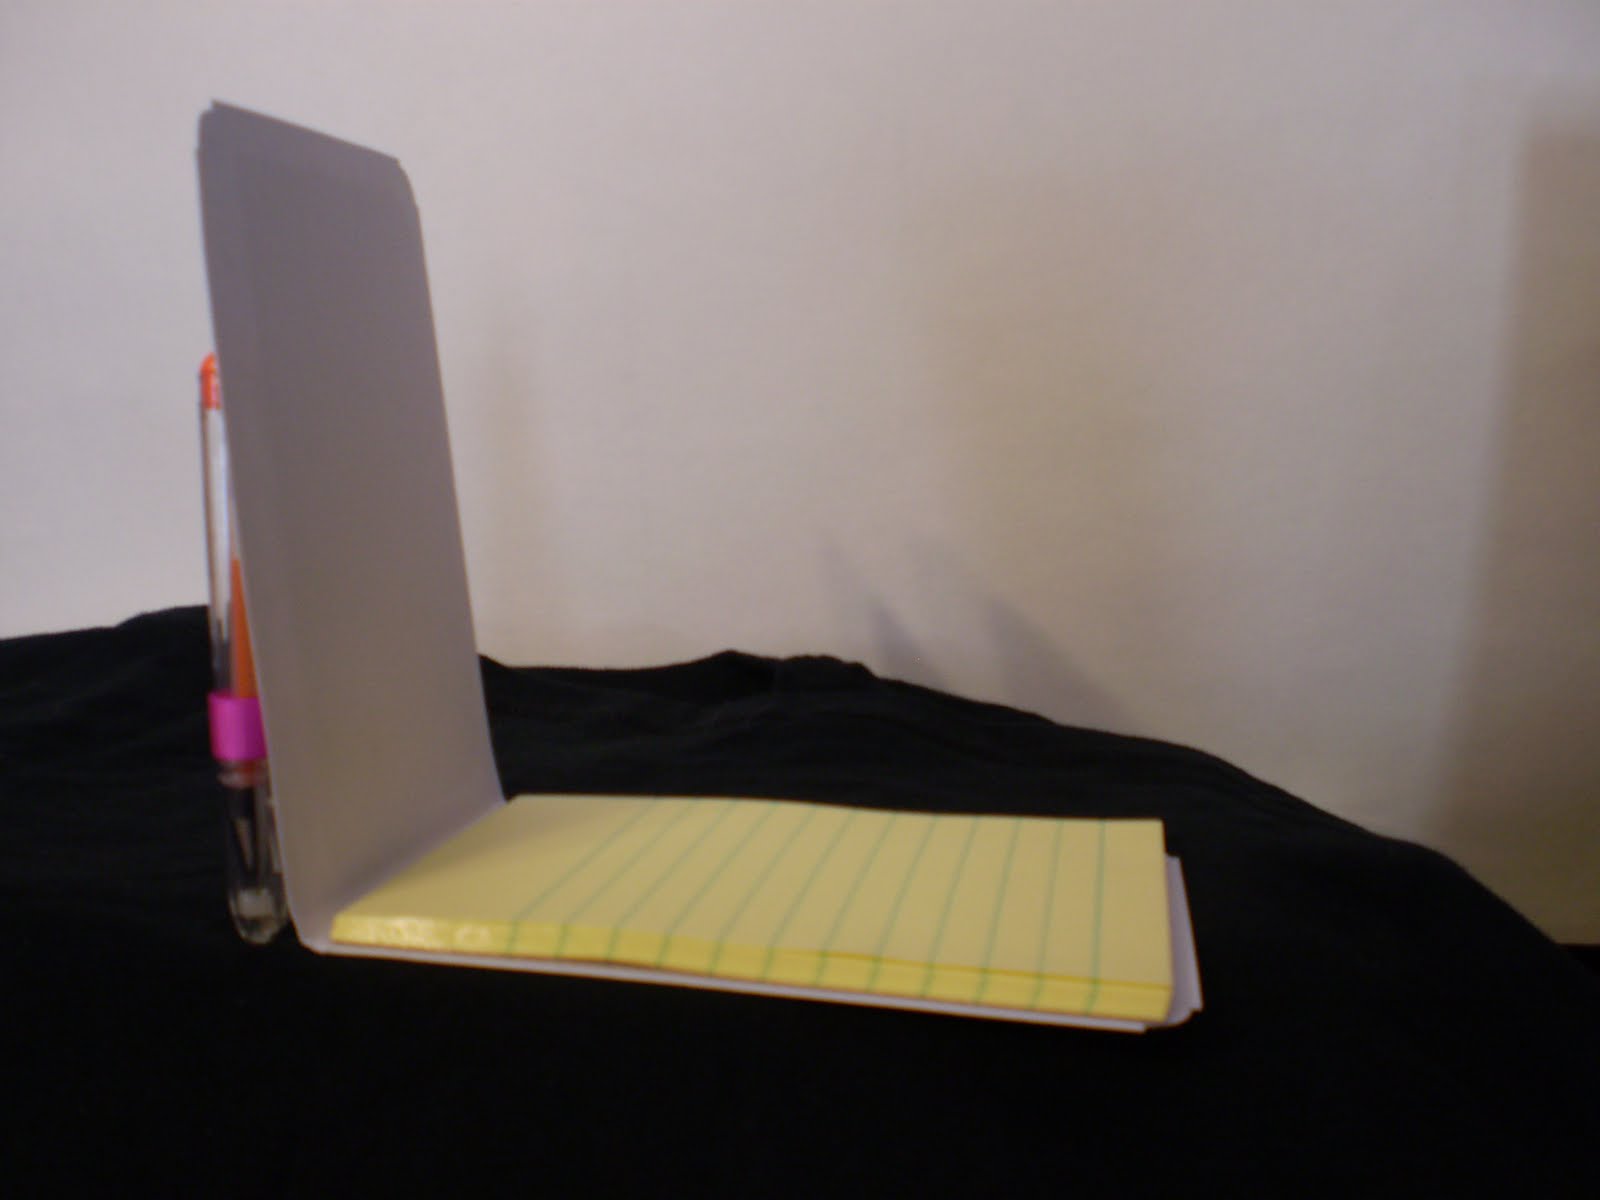
cut cardstock @ 10 1/2" x 3 3/4
score @ 5 2/8, 5 3/8 (this covers tablets measuring 3.5"x5" 35 sheets of paper)
I used the red tape to adhere the tablet to the cardstock
I used gross grain ribbon for the pen loop-make sure your pen will slide easily through before placing red tape between the ribbon forming the loop.
cut your layers of cardstock to cover front  about 1/8" in from edge
*don't forget to leave room on the front of your cover for the pen to also fit, embellish your front with your favorite character
I used white gel to doodle on edges, stuck a pre-printed  from my computer "make a note" sign on front,
silk flower, pale-green brad center of flower, self stick pink pearl on Minnie's bow!
I also use pink gross grain ribbon for the flower stem. My paper is from stash, and DCWV polka-dot from Nana's grandkids paper pack.
I hope you are inspired to make something this fun...by the way, these would be great for christmas notepads or any holiday shopping you need it for,  to give or use for yourself.
Remember the sky is the limit for the use of these and you can make them any size to fit your needs!!
Until next time.....happy scrap crafting!

Sunday, July 3, 2011

Field Trip

Today I helped a girlfriend with a Lay out for her grandkids first ride on a City Bus,,,,they were overjoyed with the idea of riding on a bus. We had a great time with creating the theme from the Locker Talk cart. It was her first time experience of using the expression machine. I also showed her how to use the Gypsy to cut out the Stop sign on the side of the bus. The image of the bus was cut at 4",  paper was from my stash, the background paper used in this layout was from DCWV-Nana' Nursery. This has now inspired me to do some layouts.....I hope this inspires you as well! Until next time..enjoy your crafting 3-day weekend.

Saturday, July 2, 2011

Giving Away Dust Cover for reaching 100 Followers...

I am going for my FIRST MILESTONE of 100 Followers!!!!
I am giving away (1) Dust Cover to one lucky winner after reaching that milestone!
The Dust Cover will be of the winner's choice of any color combination, with their blog name monogramed on it. Your choice to select a cover for either your Imagine, or Expression, or Cuttlebug!
All dust covers are padded, fully lined, with piping & monogramed! They are machine wash/dry
Here are the rules to enter the drawing:
(1) Become a follower
(2) leave me a comment with your blog link
(3) post my link of this contest on your blog
*note: if you are already a follower, then there's only (2) things left for you to do....
I am looking forward to designing YOUR DUST COVER in your favorite colors & monogramming your Blog Name on it.
The magic number of followers is 100-if I hit that milestone before 7/26 a winner will be announced on 7/26...that is the last day of entry...there is 24 days left to make it happen...GOOD LUCK EVERYONE!!

You're Invited

Here is my entry for Sonia's challenge over @ Cricut 360 degrees to create a Invitation Card!
The challenge said to use any cricut cartridge, so I was really feeling the summer bug......so I decided to create a beach scene! I used "LIFE'S A BEACH"  cartridge...finally got a chance to use it, I have had it for over 5 months and now that summer is here it feels like I am out there on the beach. I hope you get the inspiration from this card to also create something summery-fun!
Recipe: Recollection white card 6 1/2x 5
            Yellow cardstock embossed circles background
             brown paper hand torn and shaded with Tim Holtz tea-dye
             (i also shaded the chair in the same color)
all cuts done on "Life's A Beach" @ 2 1/2".....added some bright ribbon from my stash
for some bling-I used MS glitter glue-pen, the paper used for beach ball is from "DCWV Nana's Kids"
Thanks for stopping by to see my creation for today...leave me a comment so I'll know who stopped by!